Table of Contents
Abstract
This document lists and describes the Kim’s Outlook Add-in functionalities. The Outlook Add-in enable users to access Kim conveniently through Outlook; perfect for users who need quick access to Kim documents and attachments to reply to emails and attach documents. Access to your Kim Workspace additionally allows end users to interact with Kim’s workflow without leaving Outlook.
Pre-requisites for configuring and using the Outlook Plugin
Before Account Templates will be available the Add-in for end users to use there are a couple of prerequisite configurations that must be completed in the Kim Back Office by a Site Owner(s) and System Administrators in each Account. The first item requires that a Site Owner to provision a Service Certificate for Authentication. This certificate must be the same certificate configured in the Outlook Add-in website’s web.config file. The Site Owner may go to Back Office>Manage Site>Service Certificate Auth.
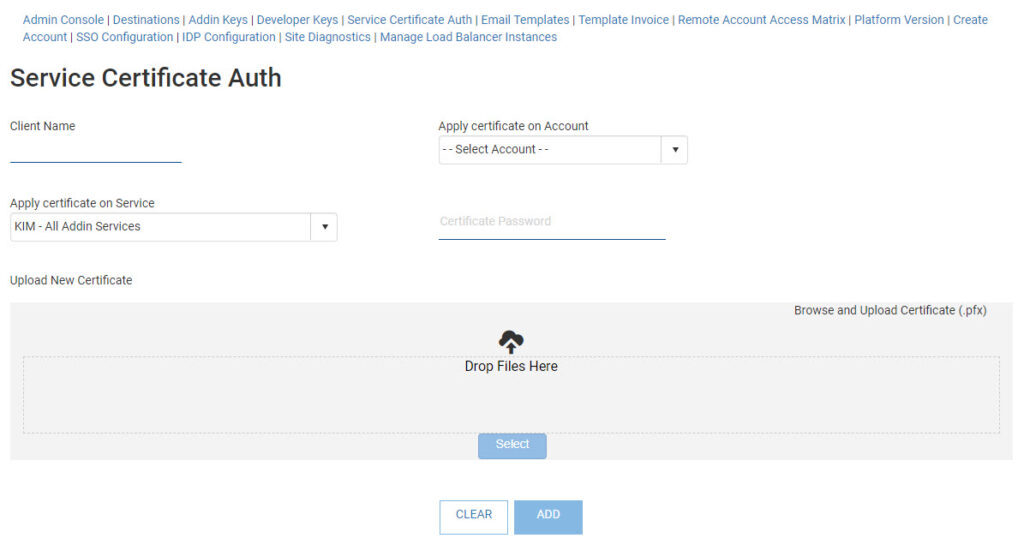
Provide an easy to remember name for the Outlook Add-In Certificate in the Client Name field. Pick the Account which you are configuring the certificate to be connected to. In the “Apply certificate on Service” dropdown control you can choose from one of the following options:
| Option | Explanation |
| Kim – All Add-in Services | All features will be available for both Word and Outlook Add-ins |
| Outlook – Upload Attachments | Case documents and attachments are available to attach to email messages |
| Outlook – Create Case | Creating a new case is possible using a Web Form Wizard in a popup browser window |
| Outlook – Update Case | Updating existing case(s) is possible using a Web Form Wizard in a popup browser window |
| Outlook – Link to Webform | Access to the case from your WorkSpace in a popup browser window |
Next you will need to supply the digital signing certificate (X509 certificate) in a PFX format. This represents an exported certificate with a private key password. Start by entering your private key string in the Certificate Password field, then browse for the PFX file (or drag-and-drop the PFX file onto the Drop Files Here drop zone. As soon as the PFX file is selected/dropped in the drop zone the password will be validated for the certificate, and if the password is valid, the ADD button will allow you to save your changes.
Template Configuration
The second prerequisite which must be configured prior to end users being able to use a Template within the Outlook Add-in is to configure one or more Templates and make them available for use within the Outlook Add-in. This functionality is enabled by System Administrators users on a Template-by-Template basis from the Template’s settings in Kim’s Back Office.
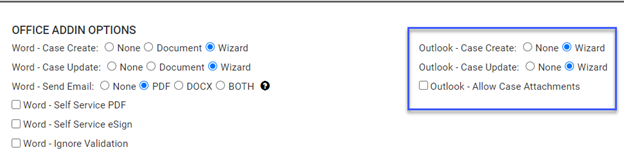
Office Add-in Options have been added to each Template’s settings to configure the Add-in.
Outlook – Case Create: Administrators are presented with three options for Case Creation through the Outlook Add-in.
- None – this feature is disabled for this Template
- Wizard – allows creating a new Case by opening the Kim Web Form wizard for the selected Template in a popup browser window within the Outlook app.
In addition to the Create Case Options, for an initiating template to be available through the Outlook Add-in, they must fulfill Kim’s existing prerequisites for Case Creation:
- Template is Active and Initiating
- Has a unique reference number
- Web form is active
- Template is linked to an active workflow
Outlook – Case Update: Administrators may select one of the following options to configure the ability to edit a Case Document within the Outlook Add-in:
- None – this feature is disabled for this Template
- Wizard – allows editing the current version of the case document by opening the Kim Web Form wizard for the selected document in a popup browser window within the Outlook app.
Outlook- Allow Case Attachments: Will display the Attachment tab in Outlook sidebar, enabling users to fetch case documents and attachments from Kim and add them to email messages as attachments.
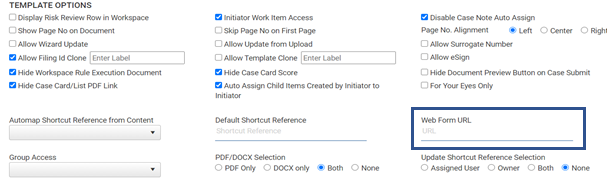
Lastly, initiating Kim Templates must also have a Web Form URL configured from the template’s settings options. To create a Web Form URL, all System Administrators have to do is choose a unique value; Kim will instantly generate the web form URL.
Accessing Kim through Outlook Add-in
The Outlook Add-in will be available once users click on the Message tab to compose a new email (the Add-in button(s) are not displayed on the Outlook application’s Main ribbon bar).
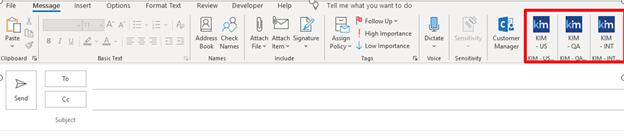
Outlook Add-in users will have already been authenticated once signing onto their email account, therefore the Outlook Add-in will perform a pass-through authentication to your Kim instance using the same username. After successfully authenticating the Outlook Add-in sidebar will appear like this:
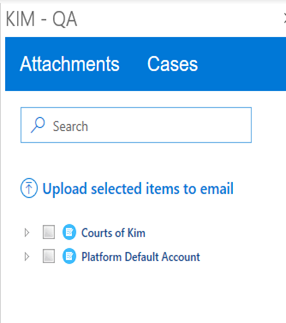
The Add-in contain two tabs labeled Attachments and Cases.
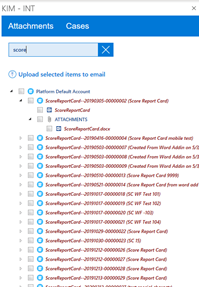
Attachments
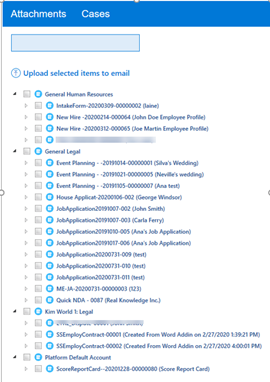
The attachments tab shows a tree view of Accounts, Documents and Attachments. Clicking on the account/arrow will expand and display all the cases currently created or assigned to the user. Every case will have a case document, and that will always be the top-most object shown under the case. Beneath that will be an Attachments node, and when the node is clicked it will expand to display all the attachments (if any) for the case.
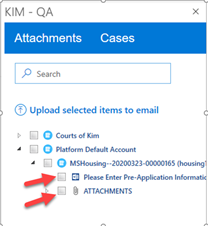
If there are any child case available, it will display underneath the Attachments.
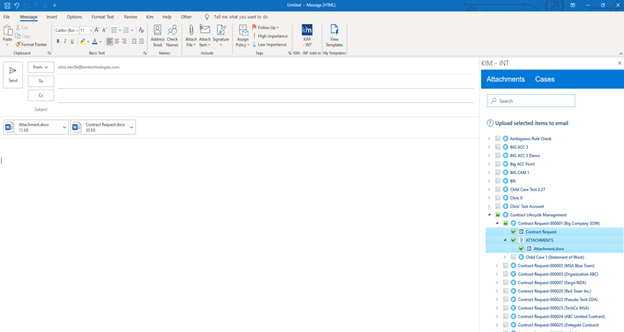
Users can select any document or attachment and click on Upload selected items to email or drag and drop the documents and attachments to the email body.
Case Management
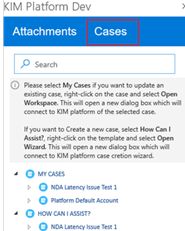
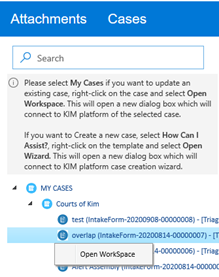
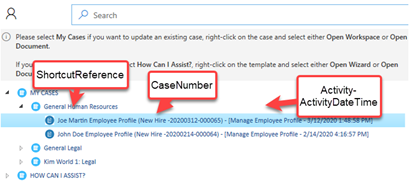
The tab Cases provides users the ability to create a case, access, and view all the user’s assigned and created existing cases. The Cases tab will display My Cases and How Can I Assist nodes. When expanding any of the nodes, Kim will display all the accounts the user has access for updating and creating a case.
- My Cases will fetch all the Accounts users have access to. When any of the account node is opened, Kim will display all the open cases assigned to the user on that account.
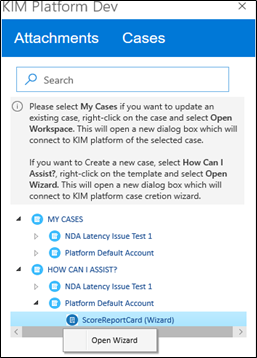
- How Can I Assist will fetch all the Accounts for which users have access to create a case. When expanding any of the account nodes, Kim will display all the templates the users have access to use with the Outlook Add-in.
Case Update
Expanding the account node on MY CASES will display all the user’s assigned active cases. To update a case, right click on the case and click on Open Workspace.
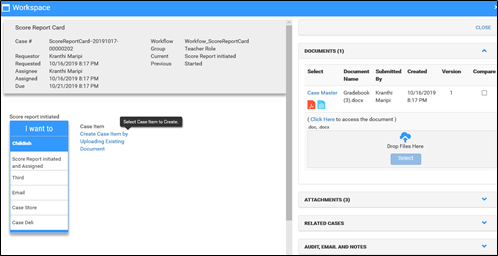
A new window containing the Kim Workspace will be opened displaying the selected Case. This allows for Workflow actioning/routing and up-version within the case.
The screenshot below shows a case opened with the Outlook plugin.
Create Case
Expanding the account node under How Can I Assist? will display all the templates for which user has access to create a case. To create a case, right click on the template and click on Open Wizard, a new window will open and will automatically login to the Kim platform case creation wizard
Once the case is submitted through the case creation wizard, the dialog window will automatically close and refresh the case management tree in Outlook. Upon successful case creation, user will receive the newly created case info on the screen.
Search
Attachment Search – Searches for specified text and gives the matching results.
Cases Search – Search can be performed by Case Description/Shortcut, Reference/Friendly Name/Activity Name. This will search all the cases across accounts for which users have access to.
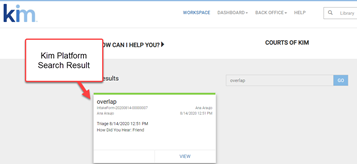
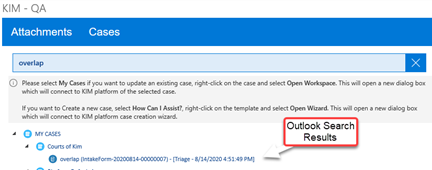
The search results will be displayed as ShortcutReference (CaseNumber) – [Activity-ActivityDateTime]
Users can then work on the account on Outlook Add-In, the same way they are able to navigate through the platform.